Translate

Monday, September 23, 2013

Marshmallow Cake


Got too many marshmallows left over now that the cooler season is over and you won't be needing those hot chocolates anymore?
Here's an incredibly simple and yummy way to get rid of them all at once! There's no baking involved, doesn't take long and can be done perfectly even for beginners. Best of all, it tastes like really light and fluffy vanilla ice cream!

I first came across this ingenious dessert years ago from a great food blog- BakingMum, while looking for a quick dessert recipe and it has been my favourite go-to cake recipe ever since (also known as my "signature dish" among friends)!

(Credits to Baking Mum for the recipe!)


Ingredients:

Base
  • 200 gm digestive biscuits
  • 80 gm melted butter


Marshmallow filling:
  • 150 gm marshmallow
  • 300 ml milk
  • 200 ml whip cream
  • 2 tsp of gelatine powder


Jello topping:
  • 1/2 pkt strawberry Jello (any flavour jelly can be used)
  • 200 ml water
  • 2 tsp gelatine powder


Additional topping:
  • Canned peach slices


Steps:
  1. (Base) Crushed digestive biscuits and mix well with melted butter. Press into a 8” tin. Refrigerate for later use.
  2. (Filling) Put all the ingredients into a pot. Boil over small fire until gelatine is dissolved. (Do not allow to bubble)
  3. (Jello topping) Boil all ingredients until dissolved.
  4. Pour marshmallow filling into the prepared baking tin with biscuit base.
  5. Put in freezer until slightly harden but not totally frozen.
  6. Take it out and arrange canned peach slices. (Press down slightly to set the peach slices in place)
  7. Put it back to freezer to harden a little.
  8. When slightly harden take it out and pour the slightly cool or cool Jello on it.
  9. Put in fridge to chill.
  10. Cut into small pieces to serve.


Variations:
  • You can also arrange some sliced fresh strawberries on the biscuit base just before pouring in the marshmallow filling.
  • Substitue strawberries for other fruits such as canned fresh starwberry slices or kiwi.
  • Use different flavour Jello (e.g. lime) for more variety. 


Tips:

  1. Match fruits that complement the flavour of the Jello, for example Lime Jello and Kiwi.
  2. Any sort of jelly besides Jello can be used. Make jelly according to the packet instructions, then add 2 tso gelatine powder.
  3. Sieve the marshmallow filling while pouring into the base to get rid of bubbles for a smooth texture.
  4. Wrap the bottom of the tin tightly with clingwrap to prevent marshmallow filling from seeping out.
  5. In Step 6: If marshmallow filling has hardened too much or not enough, the fruit slices might either not stay in place or sink into the filling.
  6. Keep cool as the cake melts easily in warm temperatures.
  7. For parties or events, an alternate method of serving is to make several mini marshmallow cakes in short, wide glasses/mugs instead of a whole large cake. They're more work, but look cute and is a lot easier to eat (scoop up like pudding) especially if it starts melting a little!


Lime & Kiwi Mini Marshmallow Cake!


Now go impress everyone with this recipe!

Friday, September 20, 2013

Tuna Fish Balls

Just about everyone I know is a fan of tasty snacks. However, many people still struggle to make/buy snacks that are high in fat and sugar. Not to worry! I thought of providing everyone with a recipe of a healthy and high protein snack of Tuna fish balls.

Tuna fish balls is a common snack in the subcontinent countries like Sri Lanka and can be served with spicy sauce and vegetables. Below is a easy and suggested recipe that everyone should use!


Recipe:

Ingredients:
  • 1 potato, boiled and mashed
  • 3-5 tblspn (or more) puree vegetables
  • small tin of tuna or salmon
  • handful of cheese (grated Parmesan or cheddar)
  • handful of bread crumbs and some egg.
  • Stuff for crumbing 


Method:
  1. Mix the puree veg, tuna or salmon and cheese into the mashed potato in the pan.
  2.  Season a little. Throw in some bread crumbs and use a little of the whisked up egg you have ready for the crumbing (you only need the tiniest bit).
  3. Roll into balls, the smaller the better. Approximately having the diameter of a 20c piece.
  4. Crumb.
  5. Shallow fry in some canola oil.
  6. Serve with tomato sauce or whatever else you want (i.e mayo)


Tips:
  • Adding mint is something most cookers do. Most people use just curry leaves. Add more green chilli or pepper for extra spice.
  • Time it takes to make: 40mins (without any distractions!)


GOOD LUCK!


Thursday, September 19, 2013

Curry Puff Cravings

Curry puffs are exactly what their name suggests- little pastry puffs filled with curry! It's a common snack in Malaysia that can be eaten anytime of the day and can be found in local coffee shops and bakeries. Personally, I could have them for every meal and never tire of it. So being in Australia and not getting to savor that delicious deep-fried piece of spicy heaven anytime of the day has felt long and empty (withdrawal symptoms?) and after 2 looong years, an epiphany hit- why don't I simply make them myself?

Getting a recipe was pretty easy, thanks to the countless enthusiastic food bloggers more technology advanced homecooks. Naturally, I picked the easiest looking recipe that required the least amount of ingredients and steps. However, I did not follow any recipe closely and simply made adjustments based on personal taste. The recipe below is meat-free and perfect for vegetarians:


Ingredients:

Filling
  • Oil
  • Curry powder
  • Chili powder
  • Potatoes (diced)
  • Red Onion (finely chopped)
  • Salt & pepper to taste

Pastry
  • 1 lb plain flour
  • 3/4 cup water
  • 5oz butter (can be substituted with margarine or shortening)
  • Pinch of salt


Steps:

Filling
  1. Boil the diced potatoes until tender (not too soft that it falls apart when pierced with a fork) then drain and run under cold water to prevent further cooking. Set aside.
  2. Heat the oil in a large saucepan, sauté onions till golden brown and fragrant.
  3. Add in curry powder and chili and fry for 1-2 minutes.
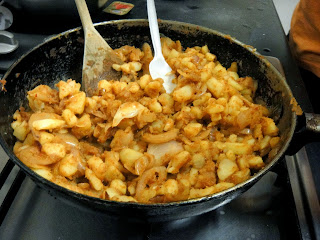
  4. Add in potatoes, salt and pepper and fry gently for about 5 minutes.
  5. Set aside to cool.

Pastry
  1. Mix all the ingredients and knead well.
  2. Set dough aside for 30 minutes.
  3. Cut the dough into circles (3 inch diameter- size can be altered based on preferences)
  4. Place 2-3 tablespoons of filling in the middle of the circle; fold pastry in half to form a half-circle shape.
  5. Pinch or braid edges to seal the fillings and prevent them from falling out during cooking (edges will seal better with a little bit of moisture, you can lightly brush the edges with water or egg white).

Cooking
  1. Heat up enough oil in a deep saucepan to cover the curry puffs.
  2. Deep fry the curry puffs till golden brown and crispy.
  3. Wait eagerly for the golden treats to cool and dig in!


Filling cooled and ready to be stuffed into the pastry skins!

Spot the difference! (Go crazy with the shapes, as long as the edges are sealed properly)


Sizzle, crackle, pop! Watch out for the spluttering hot oil.

First attempt - slightly misshaped but delicious nonetheless.

Second attempt using puff pastry - the light crumbly skin contrasts perfectly with the mushy, spicy curry filling!


As you can see, the ingredients are pretty basic and can be found in most kitchens. For the fillings, the exact amounts of each ingredients can be easily adjusted based on preference. For example, adding extra curry powder or chili powder for more oomph!, or reducing/omitting red onion for those who dislike them. There is no exact recipe for a curry puff, and everyone makes it differently, which makes it great fun to tweak and experiment with to come up with your own favourite and signature version!


Below are some yummy variations you can make to the humble and versatile curry puff!

Variations:

1. Add finely diced meat (preferably chicken - Add in the same time as the potatoes)
2. Add diced hard-boiled eggs (Add in the same time as the potatoes)
3. Buy pre-made puff pastry for a lighter, fluffier texture (saves time and make great hors d'oeuvres!)


* For a simple recipe (with exact measurements), click on the link below: 


Saturday, September 14, 2013

My macaron making experience - Turtle Macarons

This is our sweet section where we get down to the creative sides of constructing sweets! This blog post is going to show you my experience in making macarons for the first time ! And hopefully guide and inspire you to make your own !

A short story behind the motives for this little experiment:
It was our friends 18th birthday coming up, and we knew she loved turtles ! I’ve also always wanted to try my hand at making some macarons, though I've heard its very important to get the fine details correct otherwise you’d end up with flat sugar cookies .

Ingredients:

At first we followed a recipe given to me from an experienced friend. Below are the ingredients:

  • hershey’s chocolate powder (can be bought as costco!)
  • almond meal
  • pure icing sugar
  • caster sugar
  • 2 room temperature egg yolks
  • turtle templates


Steps:


  1. First we separated the yolks from the egg whites and left it in a machine whisk bowl. We then sifted through our sugar and almond meal. I had troubles because I didn’t have a proper sifter. It literally took me and a friend 2 hours to sift through 200g of almond meal.
  2. Next simply whisk the egg whites for about 4 minutes (adding the caster sugar in portions every 1 minute)  till they form stiff peaks. Then fold in the almond meal and pure icing sugar mixture with a spatula.
  3. Then just separate the mixture for the desired different flavours. The flavours we chose for the turtles shell were chocolate because our friend is a diehard chocolate fanatic!
  4. Add this mixture to a piping bag and pipe the shapes onto baking paper (using the templates underneath). I used Microsoft word to create the shapes by memory.
  5. Time to make the fillings! The fillings we chose were also a rich velvet chocolate buttercream. Set aside in the fridge till the macarons are baked.
  6. Success! This is our finished baked mini turtles. Just need to pipe our fillings next.


Results

And this is our final result !  Cute turtle macaron ~(we just stuck down the macarons with honey)

And here is the birthday with her surprise turtle macarons !


Other flavours


Alternatively you can just make some plain old mickey mouse macarons ! They’re also easy to pipe and fun to share! Below are some chocolate and strawberry flavoured macarons and some earlgrey tea and honeybutter ones !