Translate

Showing posts with label Dessert. Show all posts

Wednesday, October 9, 2013

Almond Crescent Cookies


Taking interest into my nuts and almonds addiction i decided to investigate into some sweet recipes i can show to all of you :)


Ingredients:

  • 1/3 cup sugar
  • 1/2 cup whole blanched almonds, finely ground
  • 5 ounces (10 tablespoons) unsalted butter, room temperature
  • 1 1/2 cups plus 1 tablespoon all-purpose flour
  • Vanilla sugar, for rolling


Directions:

  1. Beat all ingredients until combined, about 2 minutes. Let rest at room temperature for 2 hour.
  2. Preheat oven to 325 degrees. Roll 1 tablespoon of dough into a crescent shape. Place on a baking sheet. Repeat. Bake until light golden brown, 25 to 30 minutes. Cool on trays for 10 minutes. Roll in vanilla sugar or sprinkle over the top.


Note: Easy and fast meal to make taste fantastic :)


Tuesday, October 8, 2013

Chocolate Peanut Butter Truffles


Who doesn't love chocolate? And which chocolate lover doesn't love truffles? Truffles are surprisingly easy to make yet look expensive and delectable. No thanks to the sky high prices charged by the likes of Lindt and Guylian. No fear, here's a great 3 ingredient recipe that definitely aims to please!


Recipe and pictures courtesy of Bakerella

Serving: 36 Truffles


Ingredients
  • 8 oz cream cheese, softened to room temperature
  • 10 oz semisweet chocolate
  • 1/2 cup peanut butter


Method
  1. In a mixer, beat cream cheese until creamy and smooth.
  2. Melt chocolate in microwave in 30 second intervals, stirring in between until melted and smooth.
  3. Add peanut butter to chocolate and stir until smooth.
  4. Pour over cream cheese and stir until completely combined.
  5. Spread into an 8X8 dish and chill for several hours.
  6. Scoop chocolate out with a spoon or melon ball size scoop. Roll chocolate mixture into balls and chill for a few minutes if necessary as your body temperature will warm up the balls.
  7. Coat balls in your choice of cocoa, powdered sugar, sprinkles or chopped pecans.
  8. Keep refrigerated.


Note: Feel free to omit the peanut butter if you would like them straight up chocolate.


Ingredients!

Coat the chocolate balls with different toppings- YUM!

Wrap them up individually for a professional finish..

..or place them in mini cup holders.


Wednesday, October 2, 2013

Cake Pops


Here's a fun idea to bake when there is a large number of guests that want to be impressed !
Experiment with different designs, colours and sizes to get the ideal cake pop design for you. whether it be for a birthday party, a baby shower or a christmas get together . It's good for every occasion !


Recipe from Divas can cook


Ingredients:


  • Chocolate Cake, prepared (I used ½ of a 9×13 devils food box cake)
  • Chocolate Frosting (amount depends on moistness of cake. I used two big spoonfuls)
  • 2 boxes Premium white chocolate
  • Cake pop sticks
  • Sprinkles
  • Candy melts dye for coloring frosting


Method:


  1. Add cake to a large bowl.
  2. Crumble until it resembles fine crumbs
  3. Add in frosting a little bit at a time until cake is moist and can hold a ball shape, yet still slightly crumbly.
  4. Use your hands to incorporate the frosting into the cake crumbs.
  5. Use a mini ice cream scoop and scoop out two balls of cake mixture.
  6. Roll the mixture into a tight ball and place on a plate.
  7. Repeat until all the cake mixture has been rolled into balls.
  8. Melt 2-4 ounces of white chocolate in the microwave.
  9. Dip the tip of the cake pop sticks into the white chocolate and insert into the cake balls about half-way.
  10. Freeze for about 20 minutes.
  11. Meanwhile prepare all of your decorating supplies.
  12. Melt the remaining chocolate in a large cup. Make sure you have enough chocolate to completely submerge the cake ball.
  13. Remove cake balls from freezer.
  14. Dip cake balls carefully into the chocolate until covered.
  15. Let the excess chocolate drip off. Swirl and tap gently if needed.
  16. Add the sprinkles while the chocolate is still wet. It will harden quickly.
  17. Stick the decorated cake pop into a styrofoam block to finish setting.
  18. Place into the freezer to speed up setting time.
  19. Cover with a clear treat bag & ribbon for gift giving, if desired.
  20. Store in a single layer, in an airtight container.


Tips:

Want to use food coloring? I’d suggest using the candy melts instead of white chocolate for the coating. I wasn’t impressed with how the white chocolate took the food coloring. It made the chocolate thicker.I purchased all of my ingredients including the cake pop sticks and sprinkles at Target. The styrofoam I had already, but you can get a block of styrofoam at crafts stores or Walmart. The recipe (using only ½ of a 9 X 13 cake) makes about 13 medium sized cake balls. Feel free to change up the cake, frosting and coating. Red velvet cake, with cream cheese frosting and white chocolate coconut coating is really good! You can also use homemade cake and homemade frosting but I seriously can’t tell the difference in taste.


  • Go EASY On The Frosting: What a lot of folks failed to mention in the cake pop tutorials that I was following was to ONLY ADD A LITTLE BIT OF FROSTING. That is super important!!  Most cakes are already moist. Too much frosting and it’s ruined in my opinion, not unless you add more cake.

  • Use Your Hands To Mix:It really helps to mix it up with your hands so that you can get the feel of it. When I used a spoon to mix it up, it looked as if I wasn’t putting in enough frosting but it  turned out that it was way too much when I went to make a ball. The cake should still be a bit crumbly even when the frosting is mixed in.

  • Mini Ice Cream Scoop Works Great: Use an ice cream scoop to scoop out the “dough” so that you will have equal portions.

  • No Need To Keep Refreezing-I only placed these in the freezer once. Twice if you plan on bagging them or you want to speed up the final setting time.

  • Use A Deep, Narrow Cup For Dipping:  The melted chocolate/candy coating should be deep enough to submerge the cake ball completely to avoid having to twirl it around.

  • Box Cake Is Just Fine-  If you’re not against the ingredients, make it easy for yourself and just purchase a boxed cake and a can of ready-made frosting. I seriously couldn’t even taste a difference when I made these using homemade cake and frosting.

  • Use A Styrofoam Holder-A block of Styrofoam makes a really great holder to stick the cake pops in while they are drying and it’s cheap.


  • Some alternative designs


    Monday, September 23, 2013

    Marshmallow Cake


    Got too many marshmallows left over now that the cooler season is over and you won't be needing those hot chocolates anymore?
    Here's an incredibly simple and yummy way to get rid of them all at once! There's no baking involved, doesn't take long and can be done perfectly even for beginners. Best of all, it tastes like really light and fluffy vanilla ice cream!

    I first came across this ingenious dessert years ago from a great food blog- BakingMum, while looking for a quick dessert recipe and it has been my favourite go-to cake recipe ever since (also known as my "signature dish" among friends)!

    (Credits to Baking Mum for the recipe!)


    Ingredients:

    Base
    • 200 gm digestive biscuits
    • 80 gm melted butter


    Marshmallow filling:
    • 150 gm marshmallow
    • 300 ml milk
    • 200 ml whip cream
    • 2 tsp of gelatine powder


    Jello topping:
    • 1/2 pkt strawberry Jello (any flavour jelly can be used)
    • 200 ml water
    • 2 tsp gelatine powder


    Additional topping:
    • Canned peach slices


    Steps:
    1. (Base) Crushed digestive biscuits and mix well with melted butter. Press into a 8” tin. Refrigerate for later use.
    2. (Filling) Put all the ingredients into a pot. Boil over small fire until gelatine is dissolved. (Do not allow to bubble)
    3. (Jello topping) Boil all ingredients until dissolved.
    4. Pour marshmallow filling into the prepared baking tin with biscuit base.
    5. Put in freezer until slightly harden but not totally frozen.
    6. Take it out and arrange canned peach slices. (Press down slightly to set the peach slices in place)
    7. Put it back to freezer to harden a little.
    8. When slightly harden take it out and pour the slightly cool or cool Jello on it.
    9. Put in fridge to chill.
    10. Cut into small pieces to serve.


    Variations:
    • You can also arrange some sliced fresh strawberries on the biscuit base just before pouring in the marshmallow filling.
    • Substitue strawberries for other fruits such as canned fresh starwberry slices or kiwi.
    • Use different flavour Jello (e.g. lime) for more variety. 


    Tips:

    1. Match fruits that complement the flavour of the Jello, for example Lime Jello and Kiwi.
    2. Any sort of jelly besides Jello can be used. Make jelly according to the packet instructions, then add 2 tso gelatine powder.
    3. Sieve the marshmallow filling while pouring into the base to get rid of bubbles for a smooth texture.
    4. Wrap the bottom of the tin tightly with clingwrap to prevent marshmallow filling from seeping out.
    5. In Step 6: If marshmallow filling has hardened too much or not enough, the fruit slices might either not stay in place or sink into the filling.
    6. Keep cool as the cake melts easily in warm temperatures.
    7. For parties or events, an alternate method of serving is to make several mini marshmallow cakes in short, wide glasses/mugs instead of a whole large cake. They're more work, but look cute and is a lot easier to eat (scoop up like pudding) especially if it starts melting a little!


    Lime & Kiwi Mini Marshmallow Cake!


    Now go impress everyone with this recipe!

    Saturday, September 14, 2013

    My macaron making experience - Turtle Macarons

    This is our sweet section where we get down to the creative sides of constructing sweets! This blog post is going to show you my experience in making macarons for the first time ! And hopefully guide and inspire you to make your own !

    A short story behind the motives for this little experiment:
    It was our friends 18th birthday coming up, and we knew she loved turtles ! I’ve also always wanted to try my hand at making some macarons, though I've heard its very important to get the fine details correct otherwise you’d end up with flat sugar cookies .

    Ingredients:

    At first we followed a recipe given to me from an experienced friend. Below are the ingredients:

    • hershey’s chocolate powder (can be bought as costco!)
    • almond meal
    • pure icing sugar
    • caster sugar
    • 2 room temperature egg yolks
    • turtle templates


    Steps:


    1. First we separated the yolks from the egg whites and left it in a machine whisk bowl. We then sifted through our sugar and almond meal. I had troubles because I didn’t have a proper sifter. It literally took me and a friend 2 hours to sift through 200g of almond meal.
    2. Next simply whisk the egg whites for about 4 minutes (adding the caster sugar in portions every 1 minute)  till they form stiff peaks. Then fold in the almond meal and pure icing sugar mixture with a spatula.
    3. Then just separate the mixture for the desired different flavours. The flavours we chose for the turtles shell were chocolate because our friend is a diehard chocolate fanatic!
    4. Add this mixture to a piping bag and pipe the shapes onto baking paper (using the templates underneath). I used Microsoft word to create the shapes by memory.
    5. Time to make the fillings! The fillings we chose were also a rich velvet chocolate buttercream. Set aside in the fridge till the macarons are baked.
    6. Success! This is our finished baked mini turtles. Just need to pipe our fillings next.


    Results

    And this is our final result !  Cute turtle macaron ~(we just stuck down the macarons with honey)

    And here is the birthday with her surprise turtle macarons !


    Other flavours


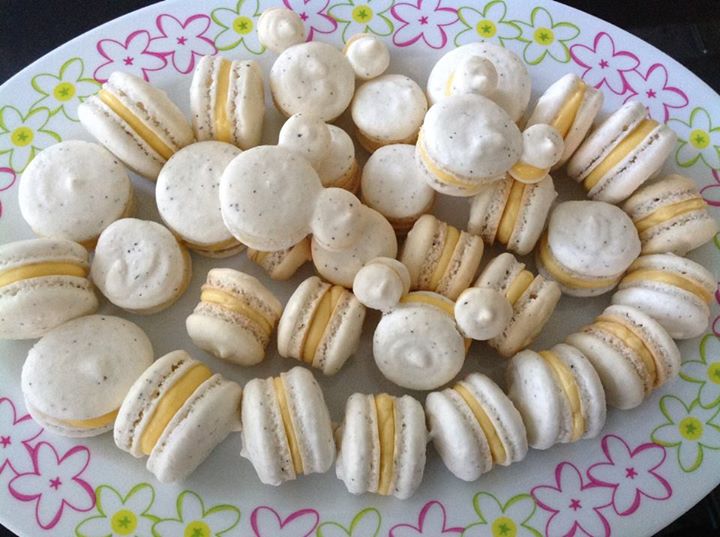
    Alternatively you can just make some plain old mickey mouse macarons ! They’re also easy to pipe and fun to share! Below are some chocolate and strawberry flavoured macarons and some earlgrey tea and honeybutter ones !