Wednesday, October 30, 2013
Wednesday, October 9, 2013
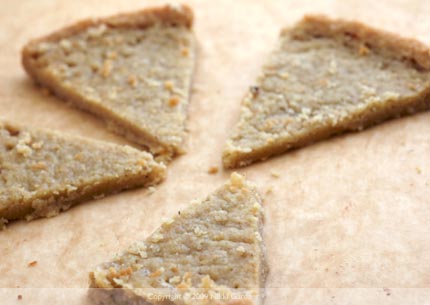
Walnut Shortbread

Ingredients:
- 1 1/4 cups walnuts
- 3/4 cup all-purpose flour
- 1/2 cup whole-wheat flour
- 2/3 cup confectioners' sugar
- 1/2 teaspoon salt
- 1/2 cup (1 stick) unsalted butter, melted
- 2 tablespoons light olive or canola oil
- 2 teaspoons finely grated lemon zest
- 1 teaspoon freshly squeezed lemon juice
Directions:
- Preheat oven to 350 degrees. Butter and flour two 8-inch round cake pans; set aside. In a food processor, combine nuts, flours, sugar, and salt; pulse until nuts are finely ground but not oily.
- Divide the mixture between the two pans and press in until even. With a knife, cut each round of dough into 8 wedges. Lightly prick the tops with the tines of a fork. Bake until set and pale tan, about 22 minutes.
- Transfer to a wire rack and cut through each wedge. Cool 10 minutes, then place onto a plate served with recommended wine :) enjoy!
Almond Crescent Cookies

Taking interest into my nuts and almonds addiction i decided to investigate into some sweet recipes i can show to all of you :)
Ingredients:
- 1/3 cup sugar
- 1/2 cup whole blanched almonds, finely ground
- 5 ounces (10 tablespoons) unsalted butter, room temperature
- 1 1/2 cups plus 1 tablespoon all-purpose flour
- Vanilla sugar, for rolling
Directions:
- Beat all ingredients until combined, about 2 minutes. Let rest at room temperature for 2 hour.
- Preheat oven to 325 degrees. Roll 1 tablespoon of dough into a crescent shape. Place on a baking sheet. Repeat. Bake until light golden brown, 25 to 30 minutes. Cool on trays for 10 minutes. Roll in vanilla sugar or sprinkle over the top.

Note: Easy and fast meal to make taste fantastic :)
Tuesday, October 8, 2013
Chocolate Peanut Butter Truffles

Recipe and pictures courtesy of Bakerella
Serving: 36 Truffles
Ingredients
- 8 oz cream cheese, softened to room temperature
- 10 oz semisweet chocolate
- 1/2 cup peanut butter
Method
- In a mixer, beat cream cheese until creamy and smooth.
- Melt chocolate in microwave in 30 second intervals, stirring in between until melted and smooth.
- Add peanut butter to chocolate and stir until smooth.
- Pour over cream cheese and stir until completely combined.
- Spread into an 8X8 dish and chill for several hours.
- Scoop chocolate out with a spoon or melon ball size scoop. Roll chocolate mixture into balls and chill for a few minutes if necessary as your body temperature will warm up the balls.
- Coat balls in your choice of cocoa, powdered sugar, sprinkles or chopped pecans.
- Keep refrigerated.
Note:
Feel free to omit the peanut butter if you would like them straight up
chocolate.
 |
| Ingredients! |
 |
| Coat the chocolate balls with different toppings- YUM! |
 |
| Wrap them up individually for a professional finish.. |
 |
| ..or place them in mini cup holders. |
Savoury Mince Rolls

Recently going to a party on the weekend i witnessed my aunty making a delicious savoury snack for her guests. I asked her to give me a really good recipe the next day so i can share with all of you :)
These are 3 important steps for all of you cookers to follow.
1. Making the Filling:
Ingredients:
1lb of ground meat (see note)
2 carrots finely grated (optional)
4 boiled potatoes coarsely mashed
1 medium onion chopped
2 green chilies seeded and chopped
1-2 Tbs of grated fresh garlic
2 inches of fresh ginger grated
10-15 curry leaves (torn)
1 small stick of cinnamon
1 Tbs of finely minced fresh mint leaves
2-4 Tbs of soy sauce
1 Tbs of vinegar
1 Tbs of curry powder
1/2 tsp of turmeric
1/2 tsp of chili flakes or powder
salt and pepper to taste (I used a lot of pepper)
juice of half a lime
2. The Pancake:

2 cups cold water
1 cup milk
1 tsp salt
1 egg
2 cups of all purpose flour
Beat all ingredients together until it forms a thin pancake batter.

Heat an 8 inch non-stick frying pan and grease it with a little oil between each pancake. Pour a ladle full of the batter into the pan and swirl it around gently until it forms a thin pancake. Cook until set without browning.

Place the cooked pancake on a plate and add about 2 Tbs of filling. Proceed to roll the pancake like an egg-roll.

3. Adding the base to the Rolls:

Roll the pancake roll into the plain breadcrumb base gently, covering the entire roll.
After u have finished adding the base deep fry them.

THE FINISHED DISH :) Serve on a plate with some spicy sauce :)

Thursday, October 3, 2013
Easy Guacamole
 I recently got a packet of Chili & Lime Nachos, and what better dip to go with that than some fresh home made guacamole?
Guacamole is a surprisingly easy dish to make and is deliciously packed with nutrients.
Also, they complement many foods, such as a sandwich spread, dips or as a side dish for meats, making them perfect for picnics, parties and potlucks.
Ingredients:
- 2 ripe guacamole (mashed, but leave some chunky bits!)
- 1 medium tomato (pulp removed; finely diced) - I used 2 small Roma tomatoes instead
- 1 small red onion (finely chopped) - I used 1/2 a medium onion
- Juice of 1/2 large lime (or lemon)
- Salt & black pepper to taste
- Mix all the ingredients in a bowl.
- Chill for at least 30 minutes before serving. (Store in air-tight container/glad wrap the bowl to prevent oxidization.)
 |
| Before.. |
 |
| After! |
- Add finely minced garlic (some people might be put off by its strong flavour)
- Add minced serrano chilis (remove seeds first) for that extra kick! (Add a little at a time as these chili can be extremely hot.)
- Add a little sour cream or cottage cheese for a thicker, creamier texture.
Yum! The perfect afternoon snack on a sunny day!
Wednesday, October 2, 2013
Hey Dhal!
Hello dhal-ing is what I was saying tonight to everyone who came across
my path when I was busy cooking dhal for the first time. Indian was on
the menu. Curried vegetables, rice and dhal. For my first time I decided
to try and cook this delicious lentil dish. Here's the recipe I used. I
didn't need to add any extra water to it, but if you feel the lentils
are getting too dry and thick, you can add extra hot water as it is
boiling away. This recipe serves 4-6. We managed 5 meals out of it.
You can eat dhal by itself, with rice or Indian breads, as an accompaniment to curry or simply garnished with fried onions on the side. It's to me one of the lighter and healthier Indian dishes.
Ingredients:
- 250g red lentils
- 1 1/2 tbs oil
- 1 large onion, finely sliced
- 2 cloves garlic, crushed or finely chopped
- 1 teaspoon of finely grated ginger
- 1/2 tsp ground tumeric
- 3 cups of hot water
- 1 tsp of salt
- 1/2 tsp garam masala
Method:
- Wash lentils thoroughly- pouring water and draining them several times.
- Drain well
- Heat the oil and fry the onions, garlic and ginger until onion is golden brown
- Add lentils and fry for a minute or two.
- Add hot water and bring to the boil reduce heat to simmer
- Cover and cook for 15-20minutes
- Add salt and garam masala
- Continue cooking until the lentils are soft and of the consistency of porridge (If there is too much liquid, leave the lid off the pan to speed evaporation)
 |
| Lentils |
 |
| Bringing it to the boil |
 |
| Almost finished |
 |
| Voila! Dhal with rice and curried vegies! |
You can eat dhal by itself, with rice or Indian breads, as an accompaniment to curry or simply garnished with fried onions on the side. It's to me one of the lighter and healthier Indian dishes.
Salmon Fishcakes
 Salmon fishcakes. Living in the country has meant that whatever seafood
we purchase it is never going to be the freshest. The closest beach to
us is at least 3 hours drive away. In any case, these salmon fishcakes
use canned tins of salmon and still taste delicious! (If I do say so
myself). They are super easy and people who are gluten free can enjoy
them too. They are really yummy with paprika aioli but even just plain
whole egg mayonnaise will do the trick.
Salmon fishcakes. Living in the country has meant that whatever seafood
we purchase it is never going to be the freshest. The closest beach to
us is at least 3 hours drive away. In any case, these salmon fishcakes
use canned tins of salmon and still taste delicious! (If I do say so
myself). They are super easy and people who are gluten free can enjoy
them too. They are really yummy with paprika aioli but even just plain
whole egg mayonnaise will do the trick.
Ingredients:
- 500g potatoes (such as pontiac or desiree), peeled
- 440g can red salmon
- 1 small onion, peeled, grated
- 2 celery sticks, finely chopped
- 1 tbs chopped fresh dill
- 1 tsp grated lemon rind
- 20ml (1 tbs) lemon juice
- 2 eggs, lightly beaten
- 40ml (2 tbs) milk
- 1/2 cup plain flour
- 2 cups fresh breadcrumbs
- Sunflower (or similar) oil, to fry
- Mayonnaise, to serve
Method:
- Cut the potatoes into rough chunks. Boil or steam until tender, then mash until smooth. Transfer to a large bowl to cool.
- In a fry pan, heat oil and fry the onions for 2-3minutes until softened and lightly browned. (this is just to take the raw taste out of the onions)
- Drain the salmon and remove any bones. Add to the potatoes with the onion, celery, dill and lemon rind and juice. Season with salt and pepper. Mix well together, then use your hands to form into 8 patties. Refrigerate for 30 minutes.
- Beat together the eggs and milk in a bowl. Place flour and breadcrumbs in separate bowls. Dip each patty in the flour, then in the egg mixture and lastly in the breadcrumbs. Heat the oil in a heavy-based saucepan over medium-high heat. Add patties (in batches) and fry both sides until golden brown. Serve with a dollop of mayonnaise and the cucumber salad.
Chicken and Mushroom Risotto
I can relate to all of the Italian food lovers out there. From fettacine
marinara to spaghetti cabonnara to beef lasagne to marguarita pizza to saffron
risotto to tiramasu to chocolate gelato, Italian food makes one
of my favourite cuisines. It's simple, easy and delicious. I'm blessed
to have a mother with a wonderful ability to cook, especially Italian
food. So I have grown up with fantastic rich tomato pasta sauces. An
italian tip: always add salt when boiling water for pasta. The water
boils quicker at a higher temperature and it gives extra flavour to the
pasta.
Leaving that aside, one of my favourite things to cook would have to be... risotto. Here's a neat recipe that goes down a treat. Serves 8 persons.
If you like, you can always add peas to this recipe. Just stir in a cup of peas 5 minutes before the end of the cooking time.
Leaving that aside, one of my favourite things to cook would have to be... risotto. Here's a neat recipe that goes down a treat. Serves 8 persons.
Ingredients:
- 4 cups (880g) risotto rice
- 2.5L chicken stock
- 500g chicken thigh fillets
- 2 brown onions (diced)
- 1/2 cup (125ml) dry white wine
- 100g button mushrooms (cut into quarters)
- 4 rashers of bacon (cut into thin strips)
- 1 1/2 tbs thyme leaves (dried or fresh)
- 40g butter
- 125ml olive oil
- 4 garlic cloves
- 1/2 cup parmesan cheese
Method:
- Put the stock on to boil
- In a separate fry pan, fry up the onions with the garlic for a few minutes before adding the chicken thighs and cook until the chicken has turned white. (just ensure that you start to cook the garlic a few minutes after you put the onions in as garlic cooks much quicker then onion and is more likely to burn)
- Add in the mushrooms and bacon and continue frying for 3 more minutes
- Season with salt and pepper
- Add the risotto rice and fry for 2 minutes more
- Pour in the wine
- Slowly add ladles of boiling stock to the pan. Wait for all the stock to absorb into the rice after each ladle before adding the next. Continue until all of the stock is gone
- Add the thyme, butter and cheese. Stir throughout
- Take off the heat and serve immediately
If you like, you can always add peas to this recipe. Just stir in a cup of peas 5 minutes before the end of the cooking time.
Crepes
Earlier on this year, I spent a chunk of 6 months in the beautiful
country of Switzerland where I learnt to speak, eat and live in the
unique swiss-french culture. Having lived with a french housemate, one
of the "tricks of the trade" that I picked up along my way was the art
of making crepes. mmm..mmm! I havn't met a person yet who does not enjoy
that tastey sweet or savoury filled paper thin pancake. Classically
eaten with a sprinkling of sugar and a squeeze of lemon juice, sweet
crepes are destined to delight any persons taste-buds. Or what about a
savoury crepe with gruyère cheese, ham, mushrooms and egg for dinner.
Anyone? Personally, a generous spread of nutella will always go down
well.
We cooked these in a crepe pan: a circular pan designed to evenly distribute the heat which has smaller edges to support flipping action (but personally I always flip by hand with a spatula).
Here's the recipe that I received from my french housemate and used successfully at many a crepe party. I remember it as the 4-3-2-1 crepe recipe.
Savoury variation:
Once one side of the crepe is cooked, flip it over. Crack an egg on the cooked side, sprinkle on gruyère cheese and ripped pieces of ham. Wait for the egg to cook to satisfaction. Fold the edges of the crepe in on itself and remove from the heat.
Other ideas:
We cooked these in a crepe pan: a circular pan designed to evenly distribute the heat which has smaller edges to support flipping action (but personally I always flip by hand with a spatula).
Here's the recipe that I received from my french housemate and used successfully at many a crepe party. I remember it as the 4-3-2-1 crepe recipe.
Ingredients:
- 4 cups of milk
- 3 eggs
- 2 cups of plain flour
- 1 pinch of salt
Method:
- Pour the milk and eggs into a mixing bowl and whisk together.
- Add the salt and small amounts of the flour slowly whilst whisking. Continue whisking until all the lumps are eliminated and the batter is smooth.
- Grease the crepe pan by rubbing oil over it's surface with a piece of paper toweling.
- Heat the crepe pan on medium-high heat on the stove.
- Using a ladle, pour one ladle of crepe batter evenly over the crepe pan. You need to work quickly at this stage swirling the pan in order for the batter to cover the entire area (this takes a bit of practice to get right). Leave to cook for several minutes.
- When the edges begin to curl upwards, flip the crepe over (I recommend using a spatula) and continue cooking for several more minutes. The crepe should be slightly browned and set. Remove from pan with a spatula and leave aside to cool.
- Repeat the process until all the crepe batter is finished, ensuring that you re-grease the pan before use each time.
Savoury variation:
Once one side of the crepe is cooked, flip it over. Crack an egg on the cooked side, sprinkle on gruyère cheese and ripped pieces of ham. Wait for the egg to cook to satisfaction. Fold the edges of the crepe in on itself and remove from the heat.
Other ideas:
- Ham, Swiss cheese, egg and spinach (ensure that you fry up the spinach in a separate pan before adding to the crepe)
- Ham, Swiss cheese, egg and mushroom (ensure that you fry up the mushrooms with herbs and onion before adding to the crepe)
- Nutella, banana and walnuts
- Nutella and strawberries
- Strawberry, fig or orange confiture
- Sugar and a squeeze of lemon
 |
| Improvising with a not-exactly-crepe-pan pan |
 |
| The ingredients |
 |
| The lazy way to whisk. I love technology. |
 |
| So... practice makes perfect hey! |
 |
| Bon appetit! |
Mini Homemade Pies
 Ever wanted to try your hand at mini baking ? Here's a tasty recipe for mini cherry pies !
Or any pie in that matter. The trick is to bake them in mini muffin tins. Experiment with different flavours and try your hand at these designs !
Credits go to not martha for the recipe!
Ingredients:
- Standard refrigerated Pillsbury pie crusts
- biscuit cutter
- Apple mini slices
- Blueberry filling
- Canned pie Cherry filling
- sugar
- lemon zest
- cinnamon
Method:
- Cut out round shapes from the pie crusts using a biscuit cutter
- Place cut outs into muffin tin moulds
- Cut up fillings into tiny pieces and fill crusts
- Add sugar, lemon and cinnamon
- Bake at 375 degrees for 12minutes (take out when tops get brown and cover with foil and bake for 3-5 more minutes until bubbly)

Tips:
- Taste amazing with a scoop of vanilla ice-cream!
- Poke the pie with a skewer to indicate whether or not the apple is cooked
Cake Pops

Here's a fun idea to bake when there is a large number of guests that want to be impressed !
Experiment with different designs, colours and sizes to get the ideal cake pop design for you. whether it be for a birthday party, a baby shower or a christmas get together . It's good for every occasion !
Recipe from Divas can cook
Ingredients:
- Chocolate Cake, prepared (I used ½ of a 9×13 devils food box cake)
- Chocolate Frosting (amount depends on moistness of cake. I used two big spoonfuls)
- 2 boxes Premium white chocolate
- Cake pop sticks
- Sprinkles
- Candy melts dye for coloring frosting
Method:
- Add cake to a large bowl.
- Crumble until it resembles fine crumbs
- Add in frosting a little bit at a time until cake is moist and can hold a ball shape, yet still slightly crumbly.
- Use your hands to incorporate the frosting into the cake crumbs.
- Use a mini ice cream scoop and scoop out two balls of cake mixture.
- Roll the mixture into a tight ball and place on a plate.
- Repeat until all the cake mixture has been rolled into balls.
- Melt 2-4 ounces of white chocolate in the microwave.
- Dip the tip of the cake pop sticks into the white chocolate and insert into the cake balls about half-way.
- Freeze for about 20 minutes.
- Meanwhile prepare all of your decorating supplies.
- Melt the remaining chocolate in a large cup. Make sure you have enough chocolate to completely submerge the cake ball.
- Remove cake balls from freezer.
- Dip cake balls carefully into the chocolate until covered.
- Let the excess chocolate drip off. Swirl and tap gently if needed.
- Add the sprinkles while the chocolate is still wet. It will harden quickly.
- Stick the decorated cake pop into a styrofoam block to finish setting.
- Place into the freezer to speed up setting time.
- Cover with a clear treat bag & ribbon for gift giving, if desired.
- Store in a single layer, in an airtight container.
Tips:
Want to use food coloring? I’d suggest using the candy melts instead of white chocolate for the coating. I wasn’t impressed with how the white chocolate took the food coloring. It made the chocolate thicker.I purchased all of my ingredients including the cake pop sticks and sprinkles at Target. The styrofoam I had already, but you can get a block of styrofoam at crafts stores or Walmart.
The recipe (using only ½ of a 9 X 13 cake) makes about 13 medium sized cake balls.
Feel free to change up the cake, frosting and coating. Red velvet cake, with cream cheese frosting and white chocolate coconut coating is really good!
You can also use homemade cake and homemade frosting but I seriously can’t tell the difference in taste.
Some alternative designs


Panda Bread
 Feel like making something creative and delicious ? Something that looks plain on the outside but suprises people when sliced open?
This bread is easy to share and is recommended for open buffets or banquets where lots of people can see and share the slices.
I found this great recipe from tablespoon where the author 'girlversusdough' inspired me to recreate this awesome loaf of bread!
Ingredients:
- 3 cups Gold Medal unbleached all-purpose flour
- 2 1/2 tbsp sugar
- 1 cup milk w/ 1 egg yolk (both should total 1 cup together)
- 3/4 tbsp salt
- 1 1/2 tbsp unsalted butter, softened
- 3 1/2 tsp cocoa powder mixed w/ 1 1/2 tsp hot water
- 2 1/4 tsp active dry yeast
Flavour:
1 tbsp green tea (matcha) powder mised w/2 tsp hot water or green food colouring
- 1. In a small bowl, microwave milk and egg yolk for about 30 seconds. Set aside.
2. In the bowl of a stand mixer, combine flour, sugar and yeast.
3. Add in butter, salt and milk mixture, stirring on low speed with the dough hook attachment.
4. Increase speed to medium and knead until dough comes together and pulls away from the sides, about 5-10 minutes. If the dough is sticky, add a tbsp-ful of flour at a time until it is smooth and elastic.
5. Divide dough into three pieces, two about equal and one about 1/3 the size of the other two.
6. Place one of the large pieces in the stand mixer bowl and mix with green tea/water mixture OR green tea food coloring until desired color is reached.
7. Remove dough from bowl and place in a lightly greased bowl, covered, to rise until doubled.
8. Clean stand mixer bowl, then place smallest piece of dough in stand mixer and combine with cocoa powder/water mixture until color is blended through. Remove dough from bowl and place in a separate, lightly greased bowl, covered, to rise until doubled.
9. Place plain piece of dough in a separate, lightly greased bowl, covered, to rise until doubled. All pieces should double in about an hour.
10. Once dough is risen, on a floured surface, divide plain dough in thirds, with one piece being half the size of the other two (as you did before). Use one of the larger pieces to form the face. Divide the cocoa dough in quarters and use two quarters to form the eyes.
11. Quickly place the smallest piece of plain dough between the eyes to keep them in place. Stretch remaining piece of plain dough over the whole bread to lock everything in place.
12. Take last two quarters of cocoa dough and form the ears.
13. Divide green dough in two pieces, one twice the size of the other. Take the small piece to fill in the space between the ears. Take the larger piece of green dough and stretch over the whole bread to lock everything in place.
14. Place dough in a lightly greased loaf pan, cover and let rise until doubled, about 1 hour.
15. Meanwhile, preheat oven to 375 degrees F.
16. Once dough is risen, bake for about 30 minutes or until golden brown on the outside (the inside should register 190 degrees F). Allow to cool completely on a cooling rack before slicing or serving.

Tips :
If your bread didn't turn out, try these things:
- Make sure that your liquids are not hotter than 100-110 F, or you will kill your yeast (and then your bread will not rise).
- If the water feels hot to you, it is too warm. However, if it's too cold, the yeast won't activate.
- If it is still not working out, try using a kitchen scale.
- Here's the measurements from a different recipe: 230 g bread flour, 70 g all-purpose flour, 30 g sugar, 210 g egg yolk plus warm milk, 4.5 g salt, 18 g unsalted butter (it has to be unsalted), 4 g dry yeast, 8 g green tea powder/maccha powder mixed with 10 g water, 8 g cocoa powder mixed with 8 g water.
- Kitchen scales are cheap, and when you're making bread, it usually turns out better and the results are the same time after time when you weigh because the measurements are more accurate, and more consistent.
Subscribe to:
Posts (Atom)